SENIAM Electrode Positions — All 26 Muscles at a Glance
SENIAM (Surface ElectroMyoGraphy for the Non-Invasive Assessment of Muscles, 1996–1999) is the European consensus project whose recommendations define the standard for surface EMG electrode placement: bipolar Ag/AgCl electrodes of ≤ 10 mm conductive diameter, 20 mm apart, parallel to the fibres, at a position given as a fraction of a line between palpable landmarks — plus a reference electrode on inactive tissue and a 10–500 Hz recording bandwidth. The table below lists the position, orientation and test movement for every SENIAM muscle as documented on EMG Guide (26 bilateral pairs); each row links to the full muscle page with starting posture, sources and recording notes.
The SENIAM sensor rules
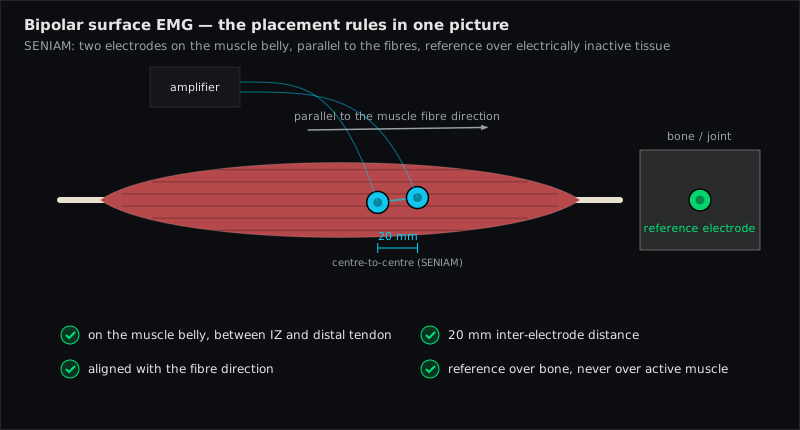
Before the positions, the four rules that apply to all of them (Hermens et al. 2000):
- Electrodes: pre-gelled Ag/AgCl, conductive area ≤ 10 mm in diameter (circular or bar).
- Inter-electrode distance: 20 mm centre-to-centre; for very small muscles smaller, but never more than a quarter of the fibre length.
- Location and orientation: on the muscle belly, between the innervation zone and the distal tendon, parallel to the fibre direction — defined by the landmark fraction in the table.
- Reference electrode: on electrically inactive tissue (wrist, ankle, C7, iliac crest, patella …).
Amplifier: input impedance > 100 MΩ, CMRR > 95 dB, noise < 1 µV RMS, bandwidth 10–500 Hz, sampling ≥ 1000 Hz (see the datasheet article). Skin preparation, fixation and the signal check are covered in the placement guide.
The 26 SENIAM muscles
| Muscle | Electrode position | Orientation | Test movement |
|---|---|---|---|
| Upper Trapezius M. Trapezius Pars Descendens · Head & Neck | 50% on line from acromion to C7 spinous process | Toward acromion–C7 line | Elevate shoulder against resistance (shoulder shrug) |
| Middle Trapezius M. Trapezius Pars Transversa · Shoulder | 50% between medial scapular border and T3 | Along the line T5–acromion | Retract scapulae against resistance (squeeze shoulder blades together) |
| Lower Trapezius M. Trapezius Pars Ascendens · Shoulder | 2/3 on line from trigonum spinae to T8 | Along the line T8–acromion | Raise arm overhead, scapula depresses downward-medially |
| Anterior Deltoid M. Deltoideus Pars Clavicularis · Shoulder | 1 finger width distal and anterior to acromion | Toward acromion–thumb | Raise arm forward (flexion) against resistance |
| Middle Deltoid M. Deltoideus Pars Acromialis · Shoulder | On the line acromion–lateral epicondyle, at the greatest bulge of the muscle | Along the line acromion–hand | Raise arm laterally (abduction 90 degrees) against resistance |
| Posterior Deltoid M. Deltoideus Pars Spinalis · Shoulder | 2 finger widths behind the acromial angle | Toward acromion–little finger | Move arm backward (extension) against resistance |
| Biceps Brachii M. Biceps Brachii · Upper Arm | 1/3 on line between cubital fossa and medial acromion (measured from the cubital fossa) | Parallel to line cubital fossa–acromion | Elbow flexion against resistance with supinated forearm |
| Triceps Brachii (Lateral Head) M. Triceps Brachii Caput Laterale · Upper Arm | 50% on line between posterior crest of the acromion and olecranon, 2 finger widths lateral to the line | Parallel to line posterior crest of the acromion–olecranon | Elbow extension against resistance |
| Triceps Brachii (Long Head) M. Triceps Brachii Caput Longum · Upper Arm | 50% on line between posterior crest of the acromion and olecranon, 2 finger widths medial to the line | Parallel to line posterior crest of the acromion–olecranon | Elbow extension against resistance with slightly retroverted arm |
| Iliocostalis Lumborum M. Iliocostalis Lumborum · Trunk Posterior | At the level of L2, 1 finger width medial to the line from the posterior superior iliac spine to the lowest point of the lower rib | Along the line posterior superior iliac spine–lowest point of the lower rib | Trunk extension from prone position against resistance |
| Longissimus Thoracis M. Longissimus Thoracis · Trunk Posterior | 2 finger widths lateral to L1 | Parallel to the spine (vertical) | Trunk extension from prone position against resistance |
| Multifidus M. Multifidus · Trunk Posterior | On the line from the caudal tip of the posterior superior iliac spine to the L1/L2 interspace, at the level of the L5 spinous process - about 2-3 cm from the midline | In the direction of that line; inter-electrode distance max. 20 mm, electrode size max. 10 mm along the fibres | Trunk extension from prone position with slight rotation against resistance |
| Gluteus Maximus M. Gluteus Maximus · Hip | 50% on line between sacrum and greater trochanter | Along the line posterior superior iliac spine–middle of the posterior thigh | Hip extension from prone position against resistance with flexed knee |
| Gluteus Medius M. Gluteus Medius · Hip | 50% on line between iliac crest and greater trochanter | Parallel to line iliac crest-greater trochanter | Hip abduction in side-lying against resistance |
| Tensor Fasciae Latae M. Tensor Fasciae Latae · Hip | Proximal 1/6 on line ASIS-lateral femoral condyle | Parallel to line ASIS-lateral femoral condyle | Hip flexion with abduction and internal rotation against resistance |
| Rectus Femoris M. Rectus Femoris · Thigh Anterior | 50% on line from ASIS to the superior patellar border | Parallel to line ASIS-superior patellar border | Knee extension in sitting against resistance |
| Vastus Lateralis M. Vastus Lateralis · Thigh Anterior | 2/3 on line from ASIS to the lateral patellar border | In the direction of the muscle fibres | Knee extension in sitting against resistance |
| Vastus Medialis M. Vastus Medialis · Thigh Anterior | 80% on line from ASIS to the joint space in front of the anterior border of the medial ligament | Almost perpendicular to that line | Terminal knee extension (last 15 degrees) against resistance |
| Biceps Femoris (Long Head) M. Biceps Femoris Caput Longum · Thigh Posterior | 50% on line between ischial tuberosity and lateral epicondyle of the tibia | Parallel to line ischial tuberosity-lateral epicondyle | Knee flexion in prone position against resistance with foot external rotation |
| Semitendinosus M. Semitendinosus · Thigh Posterior | 50% on line between ischial tuberosity and medial epicondyle of the tibia | Parallel to line ischial tuberosity-medial epicondyle | Knee flexion in prone position against resistance with foot internal rotation |
| Gastrocnemius (Medial Head) M. Gastrocnemius Caput Mediale · Lower Leg | On the most prominent bulge of the muscle | Parallel to the longitudinal axis of the lower leg | Heel raise (single leg) or plantar flexion against resistance with extended knee |
| Gastrocnemius (Lateral Head) M. Gastrocnemius Caput Laterale · Lower Leg | 1/3 on line between fibular head and heel | Along the line fibular head–heel | Heel raise (single leg) or plantar flexion against resistance with extended knee |
| Soleus M. Soleus · Lower Leg | 2/3 on line from medial femoral condyle to medial malleolus | Along the line medial femoral condyle–medial malleolus | Plantar flexion against resistance with flexed knee (isolated from gastrocnemius) |
| Tibialis Anterior M. Tibialis Anterior · Lower Leg | 1/3 on line from fibular head to medial malleolus | Parallel to line fibular head-medial malleolus | Dorsiflexion of the foot with inversion against resistance |
| Fibularis Longus M. Fibularis Longus · Lower Leg | 25% on line from fibular head to lateral malleolus | Along the line fibular head–lateral malleolus | Foot eversion against resistance |
| Fibularis Brevis M. Fibularis Brevis · Lower Leg | At 25% of the line from the tip of the lateral malleolus to the fibula head, anterior to the peroneus longus tendon | Along the line from the lateral malleolus to the fibula head, 20 mm inter-electrode distance | Foot eversion against resistance |
Positions are paraphrased from the SENIAM recommendations; the muscle page of each entry gives the starting posture, the clinical context and the recording notes (crosstalk, artifacts, placement type after Cram's).
What SENIAM does not cover
- Muscles outside the set. SENIAM covers about 30 sites; the remaining 80 muscles on EMG Guide use placements from named peer-reviewed sources (Cram's atlas, Rainoldi 2004, Falla 2002, Król 2007 …). They are marked as such on every page.
- Deep or covered muscles. Iliopsoas, supraspinatus, rhomboids, levator scapulae, tibialis posterior and others need fine-wire EMG — why. Use the measurability check for a specific muscle.
- Specificity grades. SENIAM standardises positions but does not grade how selectively each site records; that comes from Cram's (specific vs. quasi-specific).
- Interpretation. SENIAM says where to record, not what an amplitude means — see normalisation and which parameter answers which question.
Muscles referenced in this article
From placement to measurement
EMG Guide shows where the electrodes go. easyEMG with PicoBlue sensors visualises the signal live afterwards — SENIAM-conform, in real time, with a signal check on screen.
Frequently asked questions
How many muscles does SENIAM cover?
Around 30 individual sites (some muscles with several parts, e.g. the three trapezius portions and three deltoid portions); on EMG Guide these are 26 bilateral pairs = 52 muscle entries.
Is SENIAM still the standard?
Yes. The recommendations from 1999/2000 remain the reference cited by most surface EMG studies and by ISEK reporting standards; later work (Rainoldi 2004, Barbero et al. 2012) refined individual positions with innervation-zone maps but did not replace the framework.
Where can I read the original?
Hermens et al. 2000 in the Journal of Electromyography and Kinesiology and the SENIAM project publication (Roessingh Research and Development 1999); the placement pages are also on www.seniam.org.
Can I print this table?
Yes — the page prints as a plain table. Subscribers additionally get this table as a print-ready A4 PDF (form above) plus the free PDF with 49 muscle protocols including all SENIAM positions.
Sources
- Hermens HJ, Freriks B, Disselhorst-Klug C, Rau G. Development of recommendations for SEMG sensors and sensor placement procedures. J Electromyogr Kinesiol. 2000;10(5):361–374.
- Hermens HJ, Freriks B, Merletti R, et al. European Recommendations for Surface Electromyography — Results of the SENIAM project. Roessingh Research and Development; 1999.
- SENIAM project website, sensor placement recommendations (www.seniam.org).
- Stegeman DF, Hermens HJ. Standards for surface electromyography: the European project “Surface EMG for non-invasive assessment of muscles (SENIAM)”. 2007.
Read next
EMG Electrode Placement — The Practical Guide
How to place surface EMG electrodes correctly — SENIAM rules, skin prep, 20 mm spacing, fibre direction, reference electrode, signal check and common mistakes.
Specific, Quasi-Specific, General — The Three Types of Surface EMG Placement
Why there is no single correct electrode position — Cram's three placement types, what each records, where SENIAM fits, and what it means for interpretation.
Surface EMG Glossary
54 terms of surface electromyography explained in one sentence each — from amplitude cancellation to volume conduction. With sources (SENIAM, Cram's, Konrad).
All articles →