EMG Electrode Placement — The Practical Guide
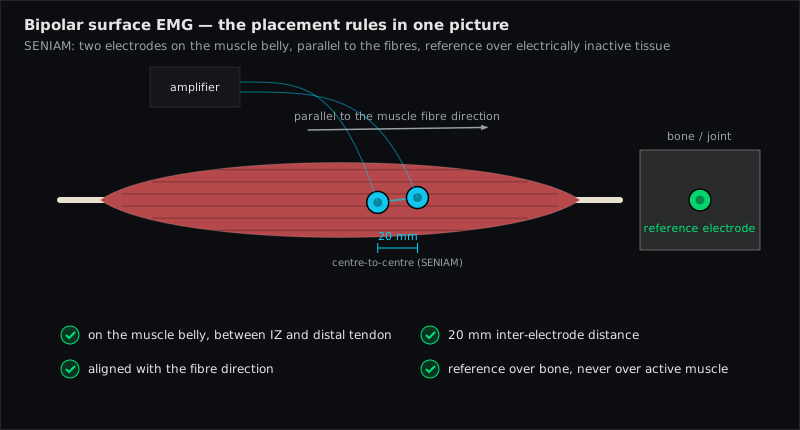
Surface EMG electrode placement means fixing a bipolar pair of small electrodes on the prepared skin over the belly of a muscle — parallel to the fibre direction, 20 mm apart centre-to-centre, between the innervation zone and the distal tendon, at a position defined by palpable bony landmarks — plus a reference electrode over electrically inactive tissue. This is the SENIAM standard (Hermens et al. 2000); it is what every muscle page on EMG Guide describes, and it is the single largest factor deciding whether an EMG recording is usable.
Why placement decides the measurement
An electrode pair records whatever electrical activity reaches it through the tissue. Move it two centimetres and three things change at once:
- Amplitude. Over the innervation zone action potentials travel in opposite directions and partly cancel — the amplitude drops and becomes unstable. Over the tendon there is hardly any signal at all. Only the muscle belly between the two gives a stable, representative amplitude.
- Selectivity. Near the border of a muscle the pair also picks up the neighbour — crosstalk that no filter can remove afterwards, because it is real EMG, just from the wrong muscle.
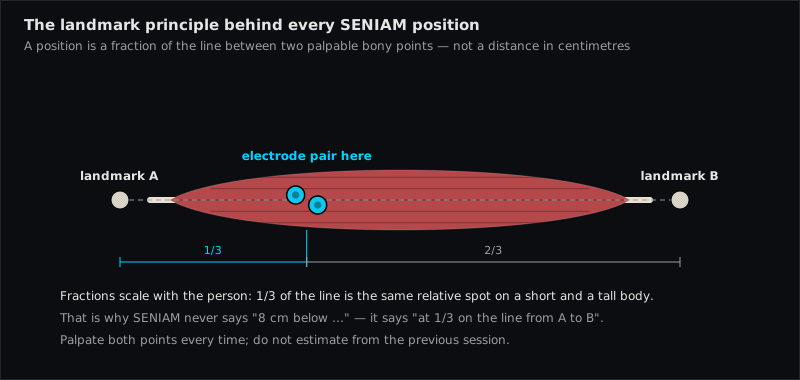
- Reproducibility. A position defined as "on the biceps" cannot be repeated next week; a position defined as "at one third of the line from the acromion to the cubital fossa" can — by you or by a colleague.
That is why standardised placement is not pedantry. Without it, a difference between two sessions can be a difference in electrode position rather than in the muscle.
The seven rules of surface EMG placement
These are the SENIAM sensor recommendations, condensed with the practical notes from Konrad and Cram's:
- Electrode type and size. Pre-gelled Ag/AgCl electrodes, conductive area ≤ 10 mm in diameter. Smaller electrodes are more selective; larger ones average more of the muscle and more of its neighbours.
- Inter-electrode distance 20 mm (centre to centre). Shorter for very small muscles — but never more than a quarter of the fibre length. Keep the distance identical between sessions and between sides.
- Parallel to the fibres. The line through both electrodes follows the muscle fibre direction. Across the fibres the amplitude drops and the frequency content is distorted.
- On the muscle belly, between innervation zone and distal tendon. SENIAM places most sites at a fraction of a landmark line for exactly this reason. Avoid the motor point region and the musculotendinous junction.
- Defined by landmarks. Acromion, C7, epicondyles, iliac crest, greater trochanter, patella, malleoli — measure the line, mark the fraction, place the pair. Write the distances down.
- Reference electrode on inactive tissue. Wrist, ankle, C7 spinous process, iliac crest or the patella — a bony spot away from the recorded muscle. A poor reference is the most common cause of a noisy baseline.
- Fix everything. Cables taped or netted so they cannot pull; electrodes placed with the muscle in the most shortened position for dynamic tasks so the pair stays on the active mass (Konrad names biceps and vastus medialis as typical migrators).
Step by step: from bare skin to a valid signal
- Position the person in the SENIAM starting posture given on the muscle page (e.g. sitting, elbow flexed 90° for Biceps Brachii; prone for Longissimus Thoracis). Landmarks move with posture — palpate in the position you will measure in.
- Prepare the skin. Shave if necessary, abrade lightly (abrasive paste or fine sandpaper, three to four gentle strokes), clean with alcohol, let it dry. The skin should be faintly reddened. For static clinical tests alcohol alone may do; for running, jumping or long sessions do the full routine.
- Find the landmarks and mark the site. Measure the reference line with a tape, mark the fraction (e.g. two thirds of the way along the line from the anterior superior iliac spine to the lateral side of the patella for Vastus Lateralis), then mark the fibre direction with a skin pen.
- Apply the pair. Centre the two electrodes on the mark, 20 mm apart, along the fibre line. Press the rims, not the gel centre. Wait — impedance keeps falling for several minutes.
- Apply the reference electrode on the nearest bony site and connect all leads; check that each lead really belongs to the muscle you think it does.
- Fix cables and sensor. Tape or elastic netting, no tension on the electrode. Never tape over the electrode itself.
- Signal check — see next section. Only after it counts as "clean" does the recording start.

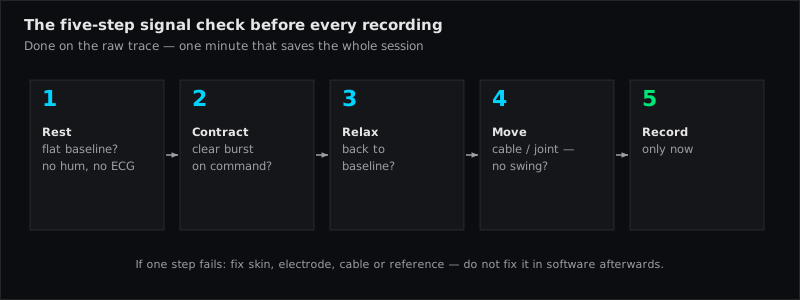
The five-step signal check (after Konrad)
- Validity. Ask for an isolated test contraction of that muscle (the test movement on every EMG Guide page). The channel that responds must be the one you labelled. Swapped leads are embarrassingly common.
- Impedance. If your system shows it: 1–5 kΩ very good, 5–10 kΩ good, 10–30 kΩ acceptable for easy conditions, above 50 kΩ repeat the preparation.
- Raw baseline at rest. Person fully relaxed, best lying down. Zoom in on the raw trace: a flat line with random spikes below 10–15 µV, mean rectified level around 1–3.5 µV, no offset, no slow waves.
- Baseline behaviour around contractions. Every burst must return to zero within milliseconds. Shifts that persist longer point to cable movement, pressure or muscle wobble.
- Frequency spectrum during a moderate static contraction: steep rise from 10 Hz, peak around 50–80 Hz, near zero by 200–250 Hz. A sharp peak at 50/60 Hz means mains hum — check grounding of nearby devices and the reference electrode before reaching for a notch filter.
Mistakes that ruin a recording
| Mistake | What you see | What to do |
|---|---|---|
| Electrode over the innervation zone | Small, unstable amplitude; changes with slight repositioning | Move towards the distal tendon along the fibre line, keep to the SENIAM fraction |
| Pair across the fibres | Reduced amplitude, odd spectrum | Re-orient parallel to the fibre direction |
| Distance > 20 mm or different per side | Larger amplitude, more crosstalk, sides not comparable | Use 20 mm everywhere; measure it |
| No or poor skin preparation | Noisy baseline, motion artifacts, mains hum | Shave, abrade, alcohol; wait 5 min |
| Reference electrode on muscle | Hum and EMG bleeding into all channels | Move it to a bony site |
| Loose cables | Slow baseline waves, spikes on movement | Tape/net the leads; 20-Hz high-pass for dynamic tasks |
| Placed with the muscle stretched | Pair slides off the belly when the muscle shortens | Place in the shortened position; check in both end ranges |
| Trunk channels without ECG check | Regular ~1 Hz spikes inflate amplitude | Recognise, gate or filter the ECG; report it |
| Muscle not actually superficial | Signal is mostly the overlying muscle | Choose a surface muscle or accept a quasi-specific group recording |
Where to find the position for each muscle
EMG Guide documents 108 muscles. For the 98 with a documented surface position, the muscle page states the exact position, orientation, starting posture and test movement, and the glossary explains the terms used. The 3D viewer shows the same position on the model — open a muscle in the viewer and the electrode pair is highlighted where it belongs:
- Shoulder and neck: Upper Trapezius, deltoid, sternocleidomastoid
- Arm: Biceps Brachii, triceps, wrist flexors and extensors
- Trunk: Rectus Abdominis, obliques, Longissimus Thoracis
- Hip and thigh: Gluteus Medius, Rectus Femoris, Vastus Lateralis, hamstrings
- Lower leg: Tibialis Anterior, Gastrocnemius (Medial Head), soleus, peroneals
52 muscles (26 bilateral pairs) carry the official SENIAM recommendation; the remaining muscles use placements from peer-reviewed sources named on each page. Every position also lists the crosstalk neighbours and the artifacts typical for that site.
Beyond SENIAM: three things to know
Not every position is equally specific. Cram's atlas distinguishes specific sites (predominantly one muscle) from quasi-specific sites (a group that surface electrodes cannot separate — wrist flexors, medial hamstrings, hip adductors). Both are legitimate; the interpretation must match. The practice block on each muscle page states the type.
Not every muscle is a surface muscle (check a muscle). Levator scapulae, rhomboids, supraspinatus, iliopsoas or tibialis posterior lie under other muscles and need fine-wire EMG. They are deliberately not in the EMG Guide catalogue — a surface pair over the trapezius records the trapezius, whatever the label says.
Standard beats individual optimisation. A position that gives you a bigger amplitude today is not automatically better; a position you can reproduce next week and compare with the literature is. Use the standard, note any deviation, and change nothing between sessions.
Muscles referenced in this article
From placement to measurement
EMG Guide shows where the electrodes go. easyEMG with PicoBlue sensors visualises the signal live afterwards — SENIAM-conform, in real time, with a signal check on screen.
Frequently asked questions
What is the correct distance between EMG electrodes?
SENIAM recommends 20 mm centre to centre for the bipolar pair. Smaller distances are allowed for small muscles (never more than a quarter of the fibre length); larger distances increase amplitude but also crosstalk and are not recommended.
Where does the reference (ground) electrode go?
On electrically inactive tissue near the recording site — typically a bony prominence such as the wrist, the ankle, the C7 spinous process, the iliac crest or the patella. Never on an active muscle.
Do I really need to shave and abrade the skin?
For slow, static tests a thorough alcohol clean can be enough. For dynamic tasks, long recordings or research-grade data, hair removal plus light abrasion is the standard — it lowers and stabilises skin impedance and is the cheapest way to prevent motion artifacts and hum.
How do I know the electrode is not on the innervation zone?
Follow the SENIAM landmark fraction, which is chosen to avoid it. If the amplitude is small and changes noticeably when you shift the pair by a centimetre along the fibres, you are probably on it — move distally.
Can I use the same placement for EMS/NMES stimulation pads?
No. Stimulation pads are placed to excite the motor point and are much larger; EMG detection electrodes are small and deliberately avoid the innervation zone. The positions on EMG Guide are recording positions only.
Which muscles cannot be measured with surface electrodes?
Deep or covered muscles: iliopsoas, tibialis posterior, levator scapulae, rhomboids, supraspinatus, the deep neck flexors and others. They require intramuscular fine-wire electrodes and are therefore not part of the EMG Guide catalogue.
Sources
- Hermens HJ, Freriks B, Disselhorst-Klug C, Rau G. Development of recommendations for SEMG sensors and sensor placement procedures. J Electromyogr Kinesiol. 2000;10(5):361–374.
- SENIAM project — www.seniam.org, sensor placement recommendations.
- Konrad P. The ABC of EMG. Noraxon; 2005 — pp. 14–24.
- Criswell E. Cram's Introduction to Surface Electromyography. 2nd ed. 2011 — Ch. 4 (site preparation, placement strategies), Ch. 5 (factors affecting interpretation).
- Merletti R, Muceli S. Tutorial. Surface EMG detection in space and time: Best practices. J Electromyogr Kinesiol. 2019;49:102363.
Read next
Surface EMG Glossary
54 terms of surface electromyography explained in one sentence each — from amplitude cancellation to volume conduction. With sources (SENIAM, Cram's, Konrad).
Can I Measure This Muscle With Surface EMG?
Interactive check for 68 muscles: specific, quasi-specific or surface-recordable — or fine-wire only. Based on Cram's grades, SENIAM and the EMG Guide catalogue.
EMG vs. EMS — Why the Electrode Positions Are Not the Same
EMG records, EMS/NMES stimulates: why stimulation pads target the motor point and EMG electrodes avoid it — and why an EMG placement guide is not an EMS pad chart.
All articles →